Invoke services
You can invoke services that have been deployed to Kalix in the following ways:
-
From another Kalix service in the same project
-
By exposing services to the internet using routes
-
During testing and development from the console or using the
akkaproxy command
Exposing services to the internet
Kalix allows you to expose your services to the internet, using routes.
A route declares how traffic to a particular hostname gets routed to your services. You can let Kalix generate a hostname for you, or you can provide your own hostname at your own domain. If you want to use your own hostname, you’ll need to register your domain and configure your Domain Name System (DNS) settings using a third party DNS service.
All traffic to Kalix uses Transport Layer Security (TLS). Kalix will automatically provision a certificate for you using Let’s Encrypt. The certificate is provisioned whether you use a Kalix provided hostname, or bring your own.
Exposing a single service
If you have a single service you want to expose to the internet using a Kalix generated hostname, you can do so using the akka service expose command. This command is provided as a convenience, particularly when you’re getting started with Kalix:
$ akka service expose my-service
Service 'my-service' was successfully exposed at: spring-tooth-3406.us-east1.kalix.app
You can now access your service using the hostname described in the output of the command above. For example, if creating a gRPC client for the above service, you need to configure it to send requests to spring-tooth-3406.us-east1.kalix.app:443.
You also have the option of enabling Cross-Origin Resource Sharing (CORS) for the service, using the --enable-cors flag.
Managing routes
Routes give you the ability to direct incoming traffic to a single hostname to more than one service. To manage this, you can use the akka routes command. Before you create a route, you need to provision a hostname.
|
Path Matching and Rewriting When defining a route with a |
Provisioning a custom hostname
If you want to provision a custom hostname, you first need to register it with your project. Only one project can use a given hostname. Let’s say the hostname you want to register is called ecommerce.acme.org. To register a hostname, use the akka project hostname add command:
$ akka project hostname add ecommerce.acme.org
HOSTNAME                      GENERATED   REGION     CNAME
ecommerce.acme.org false us-east1 us-east1.kalix.appProvisioning a generated hostname
If you do not want to bring your own hostname, you can let Kalix generate one for you, by running akka project hostname add with no arguments:
$ akka project hostname add
HOSTNAME                                      GENERATED   REGION     CNAME
young-fire-2481.us-east1.kalix.app            true        us-east1
This shows the hostname that was just generated for you. You will need this when you create your route.
Creating routes
Let’s assume you want to expose two gRPC services:
-
shopping-cart, which has a gRPC service calledacme.ecommerce.ShoppingCart -
product-info, which has a gRPC service calledacme.ecommerce.ProductInfo
The path that a gRPC service is served at is the fully qualified name of the service. For example, the example.ecommerce.ShoppingCart will have a path of /example.ecommerce.ShoppingCart.
|
Because Kalix does not perform path stripping, your service implementation must be aware of the full path defined in the route. If you map the prefix |
Let’s also assume that you want to name the route acme-ecommerce, and that the hostname you want to serve it at is ecommerce.acme.org, and that you’ve already added this hostname to the project following the instructions above.
We can now create the route:
akka route create acme-ecommerce \
  --hostname ecommerce.acme.org \
  --path /example.ecommerce.ShoppingCart=shopping-cart \
  --path /example.ecommerce.ProductInfo=product-info
Having created it, we can now get its status by listing all routes:
$ akka route list
NAME             HOSTNAME             PATHS                     CORS ENABLED   STATUS
acme-ecommerce   ecommerce.acme.org   /example.ecommerce.Sho…   false          DnsNotVerified
Note above that the status is DnsNotVerified. This indicates that the DNS configuration for our custom hostname is not correct. More details can be obtained by getting details for the route:
$ akka route get acme-ecommerce
Route: 	acme-ecommerce
Host: 	ecommerce.acme.org

Paths:
         /example.ecommerce.ShoppingCart   shopping-cart
         /example.ecommerce.ProductInfo    product-info

Status:
	HostValidation: False
		Last Transition: 	Tue Nov  9 16:45:53 2021
		Reason: 	DnsNotVerified
		Message: 	Host ecommerce.acme.org did not resolve to a CNAME record. It must be configured to be a CNAME record to us-east1.kalix.app
	Ready: False
		Last Transition: 	Tue Nov  9 16:45:53 2021
		Reason: 	Validating
		Message: 	Validating hostname
Here you can see the exact error message - your hostname is not resolving. To rectify this, you would need to go to your DNS provider and update the DNS record for the host, and then wait for that change to propagate. Once the problem is fixed, there is nothing you need to do, Kalix will periodically recheck the DNS configuration to see if it’s updated, typically every 20 minutes. Note that DNS configuration can be cached in DNS servers for up to 24 hours, so it may take that long before Kalix can see your changes.
Updating routes
Routes can be updated using the akka route update command. For example, to remove the product info service from the route, and also add an inventory service, you might run:
akka route update acme-ecommerce \
  --remove-path /example.ecommerce.ProductInfo \
  --path /example.ecommerce.Inventory=inventory
Working with route descriptors
You may want to specify your routes using a descriptor. Descriptors can be checked into source control, allowing you to version your routing configuration. This can be useful if you have complex routes.
You can export an existing route using the akka route export command, this will output the descriptor in YAML format:
$ akka route export acme-ecommerce
corsPolicy:
  allowMethods:
  - GET
  - POST
  allowOrigins:
  - https://www.acme.org
host: ecommerce.acme.org
routes:
- prefix: /example.ecommerce.ShoppingCart
  route:
    service: shopping-cart
- prefix: /example.ecommerce.ProductInfo
  route:
    service: product-info
To save the output of the command to a YAML file, you can run the command below:
akka route export acme-ecommerce > acme-commerce-routes.yamlTo use this descriptor to either create or update a route, you can pass the file name using the -f flag:
akka route update acme-ecommerce -f acme-ecommerce-route.yamlYou can also edit the route descriptor in place using the akka route edit command. This will open the route descriptor in the editor configured in the EDITOR environment variable, allowing you to edit and save it. On exiting the editor, the route will be updated:
$ akka route edit acme-ecommerce
Route updated.
For a complete reference for the Kalix route descriptor, see the Kalix route descriptor reference.
Enabling CORS
CORS can be enabled by configuring at least one allowed origin, for example:
akka route update acme-ecommerce --cors-origin https://www.acme.orgSecuring routes
All routes are served with TLS certificates. In addition, you can also enable client certificate authentication, also known as Mutual TLS (mTLS), and customise the certificates it is provisioned with. Instructions for doing this can be found in TLS certificates.
HTTP Basic authentication
It’s also possible to enable HTTP Basic authentication on routes. HTTP Basic authentication requires configuring a realm, which is returned in the WWW-Authenticate header when authentication fails or no authentication headers are present. The realm name can be anything.
Usernames and hashed passwords are stored directly in the route descriptor. Passwords can be hashed with either sha256, sha384 or sha512. Because the passwords are hashed without salt and use a computationally cheap algorithm, only strong, randomly generated passwords should be configured, to prevent brute force, password reuse or rainbow table based attacks, should the hashes be leaked. One way to generate such a password is to use OpenSSL, for example this will generate a strong password with 128 bits of entropy:
openssl rand -base64 16HTTP Basic authentication can be configured either with CLI arguments, or directly in the route descriptor, though editing the route descriptor is a little more powerful.
- CLI with command line arguments
-
The HTTP realm name can be set using
--http-basic-realm. A username/password can be added using the--http-basic-credentialsflag, passing the username and password, separated by an=sign. Multiple--http-basic-credentialsflags can be passed to configure multiple username/password pairs. Passwords should be passed in plaintext, and will be SHA256 hashed by theakkacommand before saving.These flags can be passed both to the
akka route createandakka route updatecommands, for example:akka route update my-route --http-basic-realm "My Realm" \ --http-basic-credentials "admin=correct horse battery staple" - CLI with a descriptor
-
Using either the
akka route editcommand or updating the route descriptor:host: ecommerce.acme.org validation: httpBasic: realm: "My Realm" passwordHashes: admin: "sha256:xLvLH77JnWW/WdhcjLYu4tuWPw/hBvSD2a+nO9Tjmoo=" support: "sha256:eiwSRduQVGX/XHmH00+GT8Dt/X13173SqVDCc8mNJZg=" routes: - prefix: / route: service: shopping-cartThis configures two username/passwords, one for a
adminuser and one for asupportuser. The hash value must be in the format:<hash algorithm>:<base64 hash>Valid hash algorithms are:
-
sha256 -
sha384 -
sha512
To generate such a hash value, the following OpenSSL command can be run:
echo -n "correct horse battery staple" | openssl dgst -sha256 -binary | openssl base64 -e -A -
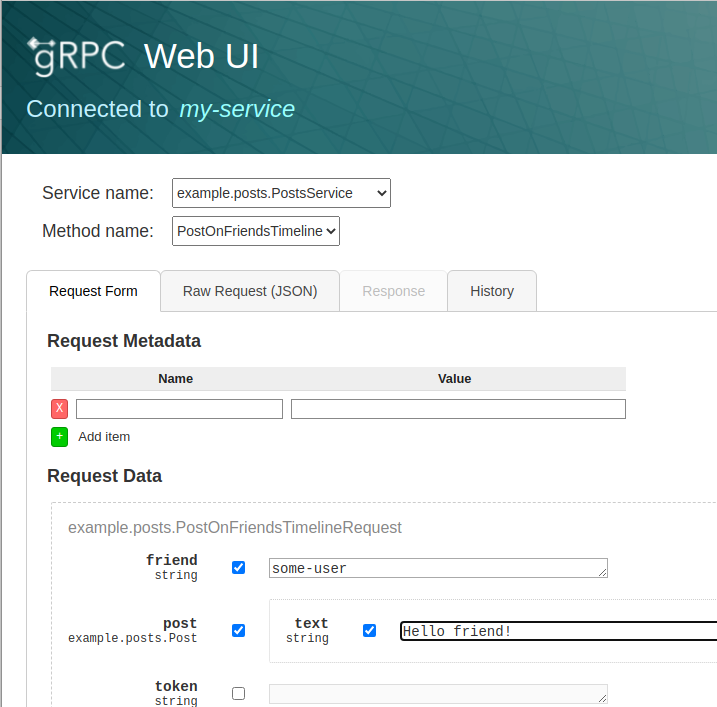
Testing and development
During testing and development, you can use the akka proxy command to invoke your services.
akka proxy command
The akka proxy command starts a proxy running locally on your machine that forwards all requests it receives to your service, via a mechanism that authenticates you as having access to manage the service, so that you can access it without exposing it to the internet. This can be used for ad-hoc invocations of your service for testing and debugging purposes, as well as by other services running locally on your machine for integration testing purposes.
In addition, it also offers a built in web based gRPC explorer that provides both form and JSON based mechanisms for creating messages, allows setting custom headers, and stores a history of prior invocations for reuse.
Starting the proxy
The proxy can be started by running the following:
akka service proxy my-serviceThis will start the proxy on port 8080 bound to localhost. The proxy runs in the foreground, and will log the requests made through it as it receives them. You can stop the proxy by hitting Ctrl+C.
You can customize the port and bind address by running:
akka service proxy my-service --port 8081 --bind-address 0.0.0.0You can now invoke your services using an HTTP or gRPC client. TLS is not enabled, so it’s important to configure gRPC clients to use plaintext connections. So for example, using grpcurl to invoke your services from another terminal window:
grpcurl -plaintext -d '{"cartId":"my-cart"}' localhost:8080 \
 com.example.shoppingcart.ShoppingCartService.GetCart
If you are using Kalix’s HTTP to gRPC transcoding support, you can also invoke them as a REST API, for example using curl:
curl http://localhost:8080/carts/my-cartUsing the built in graphical client
The akka command can also start a graphical client, which embeds grpcui in the proxy, allowing you to easily explore your services and build and make requests on them. To enable it, use the --grpcui flag:
akka service proxy my-service --grpcuiA web browser will automatically be opened for you on the gRPC UI explorer page served by the proxy: